Year: 2021

Summer Tour of Homes

Summer Tour of Homes

A couple weeks before Memorial Day, and I’m decorating the house in a patriotic theme! It’s perfect because we are so busy with birthday parties, bbq’s, camping, extracurricular actives, barn sales and whatever else comes up, that I don’t have to decorate for the 4th of July! I love adding a little patriotic feel to my normal farmhouse decor!

I was just tickled to be invited to share my Summer home tour with you all, along with some amazingly talented other bloggers! A huge “thanks” to Gina from The Shabby Creek Cottage for putting this all together and including me!

There’s just something special about adding the ol’ glorious red, white and blue around our home! It signifies Summer to me! I’m not sure what that feeling is, but I love it! I greatly appreciate the ones who have fought for our freedom, the freedom this country still has and the ones who continue to fight for it. It’s so refreshing in a world as crazy as ours, to see those little flags still have so much life! They are cherished in our home all Summer long.

So, please come on in! Both Lola and Gray are here to greet you as soon as you walk in! 🙂


As soon as you walk in, you’re greeted by my Windsor bench that I typically keep simple with a few of my favorite pieces! This beautiful old crock is a family piece passed down to me from my Great Grandma on my Mom’s side! I love sentimental pieces like that 🙂


Following the entryway is our living room. The living room is where we spend a lot of our time as a family! I keep the room comfy and practical (as much as possible!). My kids know the drill by now and most of my stuff doesn’t get touched by their little fingers anymore! But don’t let that statement fool you… they still run around the house and have fun!


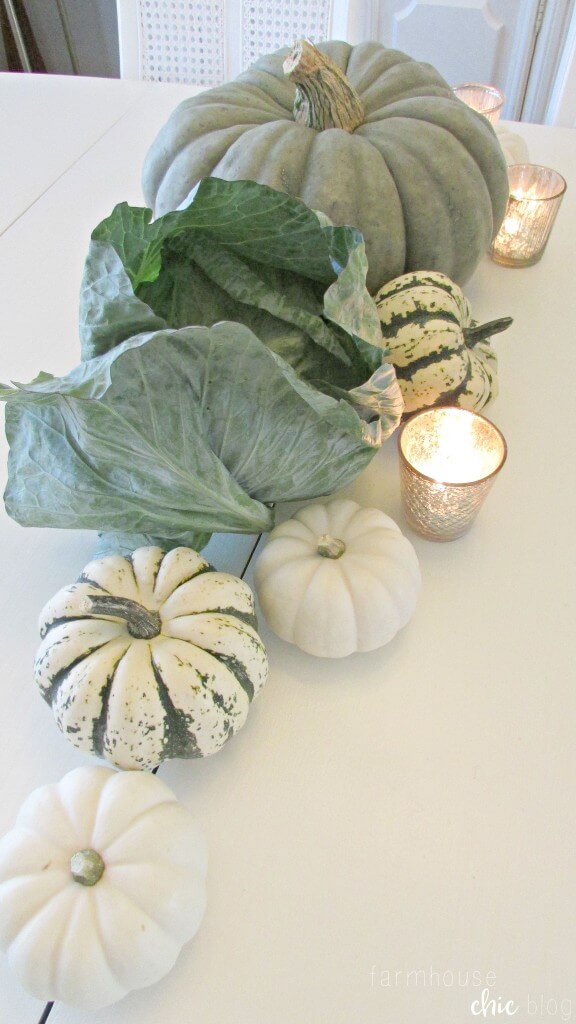
My formal dining room is probably one of my very favorite rooms to decorate! It’s directly off the living room. It’s a room that I can sit and enjoy while in the living room! We use it mostly when we have parties, large dinners, holidays, etc.

You know me, I love live greenery! But the truth is, it gets expensive buying it all the time! I was excited to find some pretty live looking pieces at a recent trip to Hobby Lobby. All the greenery displayed is faux!


As many of you may know, we’ve been renovating the kitchen for the last couple of months. It’s been a long, drawn out process because we have so much going on! I’m going to share a little sneak peek of our updated eat-in dining area! Tell me if you can spot the update 🙂


And as we go up the stairs, I’ll give you a quick peek into the master bedroom! Complete with a sleeping doodle and all 🙂 Oh, and fresh peonies from the garden!


Well that completes my Summer home tour! I will be sharing more with you soon! We are super busy preparing for a local Summer Barn Sale next weekend! I cannot wait to share all the goodies we are making it for it, so stay tuned!

Thanks a bunch for stopping by!

Please be sure to visit the other incredible homes in the Summer Tour of Homes!

Bless’er House
Julie Blanner
Worthing Court
Thistlewood Farms
Stone Gable
Rooms for Rent
Refresh Restyle
Sand Dollar Lane
The Shabby Creek Cottage


Ikea Rast Dresser Hack

Hey friends! I’m so happy you’re here today! It felt so good to get back into working on projects and doing what I love! I had the pleasure of making over an ikea rast dresser hack! I can’t wait to share with you how it turned out!

Who says you can’t take a simple ikea rast dresser and make it into your own? I’m here to show you today, just how easy it can be! Take a simple wood dresser, and turn it into your favorite piece of decor! I knew as soon as I got it, that I wanted to give it a makeover to fit in with my son’s industrial themed bedroom! I already had a design in mind, so I just went with it!

Ikea rast dresser hack

The first thing I did was give the piece a nice coat of stain. I used minx in dark walnut. From the picture below, it looks a bit splotchy, but it dried evenly. I wasn’t too worried about the splotchy-ness because I was going to be covering it with white chalk paint.

Ikea rast dresser hack

After letting the stain dry completely, I gave it a good coat of folkart chalk paint in white adirondack. Allow the first coat to completely dry. Before applying the next coat, lightly sand the first coat of paint using a sanding block. This is very important so that your paint is smooth and ready for the next coat of paint!

Did I mention lightly sanding? 😉

Apply your second coat of paint and allow to try.

Since I was going with an industrial theme, I knew I wanted big numbers to number each drawer. I simply printed out numbers I easily created on PicMonkey and printed them out. Also grab a piece of chalk, pencil, tape and paint pen. One of my favorite and go-to techniques to easily paint on wood, is simply tracing the image from the print. To start, simply grab your printed image, flip it over and brush the chalk over the entire image. Place the image in your desired spot on the wood (chalk side down), tape into place and grab your pencil to simply trace over the image (or in my case, a number!). Once you remove the paper, the chalky image will be left behind! Now you can grab your paint pen and go to town! I did this for all three drawers.

Ikea rast dresser hack

Ikea rast dresser hack

Ikea rast dresser hack

Ikea rast dresser hack

When your paint pen image is completely dry, sand any places with a sanding block that you want to appear “worn”. If you’re finished with your piece, use a clear wax to seal it! Allow the wax to dry before adding hardware.

I chose beautiful, antiqued cup pulls from Hickory Hardware for this dresser hardware. It was just the touch the dresser needed to give it that industrial look!

Ikea rast dresser hack

Ikea rast dresser hack

Ikea rast dresser hack

I’m really pleased with how it turned out! I feel like I captured the industrial look I was going for! It will be perfect for little odds and ends in our finished basement!

Thanks so much for stopping by and checking out my ikea rast dresser hack!!

Friday Favorites #4

Hello gorgeous! How are you today? Two words that will make your day: It’s Friday!!!! How stinkin’ exciting is that? No big plans here this weekend. Although, we may get the chance to get started on our kitchen reno!!! We are SO close to getting things on the move! We have our paint, backsplash and tons of fabulous ideas that I’m just dying to share with you all!

It’s not time to share the details just yet, so until then, lets see what inspired me on Pinterest this week! Ya ready?

Everything is fresh, crisp and Spring inspired!

I love those gorgeous, fresh tablescape from Ella Claire! It screams Spring!!

Friday Favorites

Spring tablescape refresh from Ella Claire  http://www.ellaclaireinspired.com/spring-tablescape-refresh/


I cannot wait until the day that I can have an outdoor greenhouse! I am in love with all of them that I see on Pinterest! How gorgeous is this one? So eloquently done!


Gorgeous greenhouse http://nicety.livejournal.com/1316149.html


You had me at dutch door, but a pink dutch door? Darling!!


Charming Texas home http://nicety.livejournal.com/1316149.html


This old farmhouse, OMG!! Absolutely stunning! And that door, wowza!


Nashville home http://gardenandgun.com/slideshow/inside-louisa-pierces-nashville-starter-house/list/


Beautiful white kitchen!! I’ve been on the search for gorgeous range hoods this week! I love this one, so unique!


Arden Road- Kathleen Kellett Interiors http://www.kathleenkellettinteriors.com/arden-road-atlanta/


I adore this simple, fresh floral arrangement! The little citrus make the entire centerpiece!


Mandi Nelson Photography http://vsco.co/mandinelson/media/5320cc75716708ce49000199


Thanks so much for stopping by friends! I hope that you leave here a little more inspired today!

I’ll see you soon, have a great weekend!

Cranberry & Brie Bruschetta

I am pretty excited to share this simple and tasty appetizer with you today! It’s absolutely perfect for your next Christmas party or gathering! Cranberry & brie bruschetta…. Enough said!

cranberry & brie bruschetta

If you’re a fan of cranberries, this is a must try recipe!! The flavors of the homemade cranberry sauce paired with the french baguette and slice of brie, is unbelievable! And the best part is, you can whip this tasty recipe up in nearly twenty minutes!

Recipe for the homemade cranberry sauce:

homemade cranberry sauce

While the cranberry sauce is cooking, cut up a loaf of french baguette into thin slices. Arrange them on a cookie sheet and brush them lightly with olive oil. Cook under the broiler for about 1 minute. Remove from the oven. I’m not sure if you’ve ever used brie before, but I always remove the rhine, which is a little messy! The way I do it is, cut the top, side and bottom. Add a small slice of brie to each baguette slice and cook at 350 F for 3-5 minutes, or until brie has melted. By this time, your cranberry sauce with be fragrant and ready! Add a spoonful of cranberry sauce to the top of your baguette and brie. Continue this for each piece!

homemade cranberry sauce

homemade cranberry sauce

homemade cranberry sauce

homemade cranberry sauce

homemade cranberry sauce

This is a beautiful display and equally delicious! I will be sharing a tasty recipe for a delicious spiked cranberry drink next week, so stayed tuned!!

Thanks for stopping by and hanging out with me today! Have a lovely week <3

Fall Centerpiece

Hey there friend 🙂 How are you today? I’m excited you’re here! I hope each of you have a wonderful week this week! I have been on cloud 9 decorating for Fall so far! I was absolutely tickled to find a local farm market had pumpkins when we went last week (I’ve been twice now 😉 ). But shh, don’t tell my husband!

Fall decor

I love how easy it is to create a beautiful Fall centerpiece by incorporating natural elements. The markets are full of cabbages, pumpkins, pears, squash and more! Use those unexpected items to create something breathtaking! Choose a color or theme you want for the season and keep it consistent throughout your design. For instance, I love the blue/green, white pumpkins and acorn squash. I love how they all look together and all produce a similar look. I also snagged a head of cabbage for just over a $1, which looks great with this mixture as well!

Folks, I really didn’t do anything spectacular here.. I simply arranged these beautiful pieces and added a few mercury glass votives. Now, tell me that isn’t easy enough? I will be adding more and staging the table as well, but as for now I’m enjoying this simple beauty <3

Fall decor

Fall decor

Fall decor

Thank you so much for stopping by! Come back again soon 🙂

Finding Inspiration…

I truly believe we all go through seasons…. seasons of becoming, seasons of growth, seasons of drought and seasons of uncertainty. Like most of us, the typical cliche outlook for a new year, is to be better than we were before… try new things, get rid of things from our lives that don’t complete us or make us better, be more present, have a lasting effect in this world. Am I right? It seems like in no time at all, we lose sight of those “resolutions”.

I will be the first to admit that resolutions or self- pressure can be a little overwhelming. Instead of looking at it as something that “has to be done”, look at it more as a mind-set change. Wake up daily and look at the positive. A beautiful, new morning! All the blessings you have. What you’re thankful for. And thank God for those things out loud while you’re getting ready for the day or taking a shower. Verbalize your gratefulness.

Finding Inspiration

It’s amazing what those little changes can do to our mindset for the day! Start by making gradual changes each day, each week or even each month. This is YOUR life, you are in control and there is no rush. Breathe. Girl, you got this! You are SO worth this change you’ve been longing for!!

With that being said, that brings me to the topic of finding inspiration. It’s hard to find inspiration when you are in a place of uncertainty. And when I say uncertainty, I mean finding your place in this big world. As a home decor blogger, I have changed so many things around my house time and time again. I have done many DIY projects. I have shared my favorite recipes. You name it, I’ve done it! There are so many amazing people out there that do the same things I do and sometimes I feel less than. I know it’s silly, but it’s a feeling I know a lot of us get in one way or another.

I have struggled with finding inspiration after the holidays this year. And that brings me to the question… What do you want to see from me this year in 2020? What type of content would you like me to share on the blog?

More home projects? More DIY? More home decor finds & antiques?

I want to hear from you! Having a little direction will give me inspiration!

Non-traditional Chic Halloween Mantel

Hey you, thanks for stopping by today! I know, just last week I shared my Fall 2015 Home Tour, but just like that I’ve taken down my Fall mantel and decorated for Halloween! I normally don’t decorate for Halloween, but this year my little ones have convinced me to, and I’m very pleased with how my non-traditional chic Halloween mantel turned out!

Halloween

Since my design this Fall has been neutral colors, I continued with that theme and came up with something daringly different! I opted for white, eucalyptus, mercury glass and crystals!

I very easily created a doilie banner, by simply hot gluing four dollar store paper doilies to a piece of twine. I hung that piece first. I then hung a “BOO” book page banner I had made, days before, off the sides. Lastly, using small pieces of fish line on the ends, I created a loop and taped a strand of crystal in between the two banners. I was so pleased with how it turned out, and how simple it was to achieve!

Halloween

The fresh silver dollar eucalyptus never disappoints! I purchased a bunch from my local grocer the other day and added bits to this design. As I’ve said before, I just adore how whimsy it is!! Oh, and do you see that cute little Halloween printable to the left there? I will be sharing that next week over at Just Us Four blog, where I contribute free printables once a month!

My little one and I spotted black glittery spiders on sale at Michaels, and they fit in perfectly throughout our mantel! It’s just the right amount of black! And, of course, you can never go wrong with glitter! I painted the previously gold picture frame I scored at Goodwill for less than buck, with black chalk paint and I love it now!

I added a couple mini white pumpkins, some of my go-to kraft covered books, some mercury glass and voila! After just a few short minutes, a non-traditional chic Halloween mantel was created!

Halloween

Thank you so much for stopping by! So, what do you think of this non-traditional Halloween design? Is it something you would add to your home? I love to hear your feedback 🙂

Sharing this post on these blogs!

Farmhouse Shabby Chic Christmas

Hello there beautiful, how are you? I’m excited (as always!), that you’re here today! Guess what? I’m sharing with you my office Christmas tree- farmhouse shabby chic Christmas! It’s the perfect touch of feminine and chic! I’m sort of obsessed with it!! Kick off your shoes, grab a cozy blanket and make yourself comfy!

farmhouse shabby chic Christmas

I wish I could capture the gorgeous, steady snowfall outside right now! It makes this pink, chic design that much more fun! I know most people think I’m crazy, but I love snow in the month of December! It makes this time of the year, all that more magical! Plus, I celebrate my birthday mid month and always wish for a white Christmas!

I was really excited to decorate my office tree with pink, white and gold this year! It’s just the right touch of shabby chic and feminine and I’m totally loving how it all looks together! What girly-girl doesn’t want a tree to match with her style!

farmhouse shabby chic Christmas

Since I can remember, I’ve also always been in love with animal print, so my beautiful pillow case and funky animal print bag dress this design up even more! Not to mention, my super comfy large faux fur rug, makes this space ready for a little snuggling!

I’m wishing you a very Merry Christmas friends. <3

Spooky, Chic Halloween Mantel

Boo! Tis’ the season to get extra spooky! To embrace your fun & out-of-the norm design styles that you may fall into on a daily basis.

Today I’m sharing my spooky, chic halloween mantel with you all & I must say I had SO much fun with this! It was a special request from my daughter to decorate, more than we normally do, for halloween this year! Without hesitation I said YES!

For the design, I wanted to incorporate black as the bold, stark focal point. I found these paper bats from Target & unfortunately they are no longer available, but you can find similar [ here, here & here]. We just began sticking them on the wall in a curved manner. I love how it turned out!

Next, we started with a clean slate on the mantel. I wanted to add my favorite mercury glass pieces, old books, dried hydrangeas, fake spider webs & my baby boo pumpkins! Oh, and for fun we added mini black witch hats!

Here’s what we came up with…

Chic Halloween Mantel

If you follow along on Instagram, you may have participated in the poll last week, of me asking if I should decorate a halloween tree. I did this a few years back too, you can click here to see that post.

I am so happy with how this little spooky tree turned out! Almost all items used came from the dollar store! We used things like fake spider webs, skull ornaments, glow-in-the-dark witch fingers, sparkly ornaments & a witch hat as the tree topper!


We had so much fun with this design! Soon we will be decorating the porch for halloween, so stay tuned for that!

Home for Christmas

Welcome! It’s a real pleasure to have you here today! Today I get to share with you my living room decorated for Christmas! I have joined some incredibly talented bloggers, Hometalk.com and Country Living.com to bring you the Home for Christmas series! In this series, you will find a variety of everything Christmas! Please be sure to visit the other links linked up at the bottom of this post!

Home for Christmas

If you follow me on Facebook and Instagram, you know I shared that my 4 year old daughter decorated our Christmas tree this year! I added less than a dozen of pieces myself, so this is all her work! I typically let the kids decorate the tree and then “rearrange” it while they’re sleeping (I’m not the only one, right?). Well, this year she did such a fabulous job (I’m still very impressed!) that I decided to keep it just as it is!

This year I opted for a Winter Wonderland design! Natural accents, neutral tones, faux fur and tons of glitter!! It truly creates a comfy home for Christmas!

Now, let’s get to it.. I’m so tickled to share my home with you all this Christmas!


Home for Christmas

Thank you so much for stopping by and checking out my living room decorated for Christmas! I hope that you will stop back soon, I will be sharing more of my home with you!

Scroll to top